37-40学时:人工智能及老年人情绪检测模型训练实践
人工智能及大模型训练应用实践
一、实验目的
使用TensorFlow训练AI模型,识别7种人脸情绪:愤怒(angry)、厌恶(disgust)、害怕(fear)、开心(happy)、伤心(sad)、惊讶(surprise)、中性(neutral)。
掌握数据预处理、模型训练和评估的基本技能。
加深对机器学习模型工作原理的理解,为健康养老相关数据模型奠定基础。
二、实验工具
PyCharm:用于代码编写和运行。
Python环境:Python 3.10+。
库:
tensorflow,numpy,matplotlib,pandas,scikit-learn,Pillow,opencv-python.手机摄像头:通过iVCam将手机用作电脑摄像头。
三、实验环境设置
安装必要库:
打开PyCharm,创建项目(如
D:\demo\emotion)。在PyCharm终端运行:
pip install tensorflow numpy matplotlib pandas scikit-learn Pillow opencv-python -i https://pypi.tuna.tsinghua.edu.cn/simple或(直接下载老师下载好的虚拟环境.venv,https://192.168.189.3:8182/down/8xpYC4cJABXU.zip )
或通过
File > Settings > Python Interpreter点击“+”号搜索并安装上述库。验证安装:
运行
pip list,确认库已安装。
配置iVCam:
电脑端:下载并安装iVCam(https://192.168.189.3:8182/down/zhPd0n2WQwWe.exe )。
手机端:在手机上安装iVCam App(iOS/Android)。
安卓:
苹果去appstore搜索iVCam连接:
确保手机和电脑在同一Wi-Fi网络。
打开手机iVCam App,电脑自动检测并连接。
iVCam摄像头索引可能不是
0(默认)。测试时尝试1或2(如cv2.VideoCapture(1))。
验证:
在PyCharm中新建testcamera文件,运行以下代码:
import cv2

def find_available_camera(max_index=5):
"""查找第一个可用摄像头索引"""
for i in range(max_index):
 cap = cv2.VideoCapture(i, cv2.CAP_DSHOW)
 if cap.isOpened():
     cap.release()
     return i
return -1

def preview_camera(index):
"""打开摄像头并实时预览,按 ESC 或关闭窗口退出"""
cap = cv2.VideoCapture(index, cv2.CAP_DSHOW)
if not cap.isOpened():
 print(f"无法打开摄像头 {index}")
 return

window_name = "Camera Preview"  # 避免中文乱码
cv2.namedWindow(window_name, cv2.WINDOW_NORMAL)

print(f"正在预览摄像头 {index},按 ESC 键或关闭窗口退出")

while True:
 ret, frame = cap.read()
 if not ret:
     print("无法读取画面")
     break

 cv2.imshow(window_name, frame)
 key = cv2.waitKey(1) & 0xFF
 # ESC键或窗口关闭退出
 if key == 27 or cv2.getWindowProperty(window_name, cv2.WND_PROP_VISIBLE) < 1:
     break

cap.release()
cv2.destroyAllWindows()

if __name__ == "__main__":
camera_index = find_available_camera()
if camera_index == -1:
 print("未检测到可用摄像头")
else:
 preview_camera(camera_index)
效果如下:
项目路径:
数据和模型路径:
D:\demo\emotion。数据集目录:
D:\demo\emotion\train,包含7个子文件夹(angry,disgust,fear,happy,sad,surprise,neutral),每文件夹100张图片。Haar级联文件:
D:\ai_images\haarcascade_frontalface_default.xml(确保路径正确)。
数据准备:
准备7种表情图片,从开源数据集获取或采集,存放在:
D:\demo\emotion\train\angryD:\demo\emotion\train\disgustD:\demo\emotion\train\fearD:\demo\emotion\train\happyD:\demo\emotion\train\sadD:\demo\emotion\train\surpriseD:\demo\emotion\train\neutral
图片格式:支持JPG、PNG等,建议统一格式(如JPG)。
四、实验步骤
步骤1:数据预处理
加载图片,从7个文件夹读取700张图片(每类100张)。
转换为灰度图,调整大小为48x48,归一化像素值到[0,1]。
标签转为one-hot编码。
步骤2:构建模型
使用卷积神经网络(CNN),包含3个卷积层、池化层、Dropout层和全连接层。
输出7个类别(对应7种情绪)。
步骤3:训练与实时检测
整合训练和检测功能,通过命令行参数(
--mode)选择模式。训练:划分训练集和测试集,训练20个epoch,保存模型。
检测:使用iVCam摄像头实时检测情绪。
五、代码实现
以下是整合后的代码,适配PyCharm环境,优化了数据加载、模型训练和实时检测功能。代码使用命令行参数控制运行模式(--mode train 或 --mode detect),并确保路径(D:\demo\emotion)正确。
import os  # 用于与操作系统交互(如文件路径操作)
import numpy as np  # 用于数值运算和数组处理
from PIL import Image  # 用于加载和处理图像文件
from tensorflow.keras.models import Sequential, load_model  # 用于构建和加载神经网络模型
from tensorflow.keras.layers import Conv2D, MaxPooling2D, Flatten, Dense, Activation, Dropout  # 用于构建卷积神经网络的层
from tensorflow.keras.utils import to_categorical  # 用于将标签转换为独热编码格式
from sklearn.model_selection import train_test_split  # 用于将数据分割为训练集和测试集
import matplotlib.pyplot as plt  # 用于绘制训练过程中的指标图表
import cv2  # 用于实时视频捕获和人脸检测
import argparse  # 用于解析命令行参数
import logging  # 用于记录运行过程中的信息和错误

# 配置日志,设置日志级别为 INFO,格式包括时间戳、日志级别和消息
logging.basicConfig(level=logging.INFO, format='%(asctime)s - %(levelname)s - %(message)s')
logger = logging.getLogger(__name__)  # 为当前模块创建日志记录器实例


def load_images(image_directory):
    """
    从指定目录加载并预处理图像数据。

    参数:
        image_directory (str): 图像数据所在的目录路径

    返回:
        images (np.array): 预处理后的图像数组
        labels_one_hot (np.array): 独热编码的标签数组
    """
    labels = []  # 存储图像标签
    images = []  # 存储预处理后的图像数据
    # 定义情绪标签到整数的映射
    label_map = {'angry': 0, 'disgust': 1, 'fear': 2, 'happy': 3, 'sad': 4, 'surprise': 5, 'neutral': 6}

    logger.info("正在加载图像数据...")  # 记录开始加载图像的日志
    for label_dir in label_map.keys():  # 遍历每种情绪标签
        class_dir = os.path.join(image_directory, label_dir)  # 构建情绪类别目录路径
        if not os.path.exists(class_dir):  # 检查目录是否存在
            raise FileNotFoundError(f"未找到目录:{class_dir}")
        for image_path in os.listdir(class_dir):  # 遍历目录中的图像文件
            try:
                # 打开图像文件
                image = Image.open(os.path.join(class_dir, image_path))
                image = image.convert('L')  # 转换为灰度图以减少计算量
                image = image.resize((48, 48))  # 调整图像大小为 48x48 像素
                image_array = np.array(image).astype('float32') / 255  # 转换为浮点数组并归一化到 [0,1]
                image_array = np.expand_dims(image_array, axis=-1)  # 添加通道维度,形状变为 (48, 48, 1)
                images.append(image_array)  # 添加到图像列表
                labels.append(label_map[label_dir])  # 添加对应的标签
            except Exception as e:
                logger.warning(f"加载图像 {image_path} 失败:{e}")  # 记录加载失败的图像

    images = np.array(images)  # 将图像列表转换为 numpy 数组
    labels = np.array(labels)  # 将标签列表转换为 numpy 数组
    labels_one_hot = to_categorical(labels, num_classes=7)  # 转换为独热编码格式,7 个类别

    logger.info(f"图像加载完成:{images.shape},标签:{labels.shape}")  # 记录加载完成的信息
    return images, labels_one_hot  # 返回预处理后的图像和标签


def build_model():
    """
    构建卷积神经网络 (CNN) 模型。

    返回:
        model: 编译好的 Keras 模型
    """
    # 创建一个顺序模型
    model = Sequential([
        # 第一卷积层:32 个 3x3 卷积核,填充方式为 'same',输入形状为 (48, 48, 1)
        Conv2D(32, (3, 3), padding='same', input_shape=(48, 48, 1)),
        Activation('relu'),  # ReLU 激活函数
        MaxPooling2D(pool_size=(2, 2)),  # 2x2 最大池化层,减少特征图尺寸
        # 第二卷积层:64 个 3x3 卷积核
        Conv2D(64, (3, 3), padding='same'),
        Activation('relu'),
        MaxPooling2D(pool_size=(2, 2)),
        # 第三卷积层:128 个 3x3 卷积核
        Conv2D(128, (3, 3), padding='same'),
        Activation('relu'),
        MaxPooling2D(pool_size=(2, 2)),
        Flatten(),  # 将特征图展平为一维向量
        Dense(256),  # 全连接层,256 个神经元
        Activation('relu'),
        Dropout(0.5),  # Dropout 层,丢弃 50% 的神经元以防止过拟合
        Dense(7),  # 输出层,7 个神经元对应 7 种情绪
        Activation('softmax')  # Softmax 激活函数,输出概率分布
    ])
    # 编译模型,使用 Adam 优化器,分类交叉熵损失函数,评估指标为准确率
    model.compile(optimizer='adam', loss='categorical_crossentropy', metrics=['accuracy'])
    model.summary()  # 打印模型结构
    return model  # 返回编译好的模型


def train_model(image_directory, model_path):
    """
    训练模型并保存到指定路径。

    参数:
        image_directory (str): 训练图像所在的目录路径
        model_path (str): 模型保存路径
    """
    images, labels = load_images(image_directory)  # 加载图像和标签数据

    # 打印前 700 个标签样本以便调试
    logger.info("前700个标签样本:")
    for i in range(min(700, len(labels))):
        logger.info(f"标签 {i}:{labels[i]}")

    # 将数据划分为训练集和测试集,测试集占比 20%
    x_train, x_test, y_train, y_test = train_test_split(images, labels, test_size=0.2, random_state=42)

    # 统计每类样本数量
    label_counts = np.sum(labels, axis=0)
    logger.info(f"每类样本数量:{label_counts}")
    logger.info(f"样本图像维度:{images.shape}")
    logger.info(f"样本标签维度:{labels.shape}")

    # 构建并训练模型
    model = build_model()  # 创建模型
    logger.info("开始训练模型...")  # 记录训练开始
    # 训练模型,20 个 epoch,批量大小为 64,验证集占比 10%
    history = model.fit(x_train, y_train, epochs=20, batch_size=64, validation_split=0.1)

    # 保存训练好的模型
    model.save(model_path)
    logger.info(f"模型训练完成,已保存为:{model_path}")

    # 在测试集上评估模型性能
    test_loss, test_acc = model.evaluate(x_test, y_test, verbose=2)
    logger.info(f"测试集准确率:{test_acc}")

    # 可视化训练过程中的准确率和损失
    plt.figure(figsize=(12, 4))  # 设置画布大小
    plt.subplot(1, 2, 1)  # 第一个子图:准确率
    plt.plot(history.history['accuracy'], label='Training Accuracy')  # 训练准确率
    plt.plot(history.history['val_accuracy'], label='Validation Accuracy')  # 验证准确率
    plt.legend()  # 显示图例
    plt.title('Training and Validation Accuracy')  # 设置标题
    plt.subplot(1, 2, 2)  # 第二个子图:损失
    plt.plot(history.history['loss'], label='Training Loss')  # 训练损失
    plt.plot(history.history['val_loss'], label='Validation Loss')  # 验证损失
    plt.legend()
    plt.title('Training and Validation Loss')
    plt.savefig('training_plot.png')  # 保存图表为 PNG 文件
    plt.close()  # 关闭画布
    logger.info("训练过程图表已保存为:training_plot.png")


def real_time_detection(model_path, haar_path, camera_index=0):
    """
    使用摄像头进行实时情绪检测,支持虚拟摄像头(如 iVCam),按 'q' 键退出。

    参数:
        model_path (str): 训练好的模型文件路径
        haar_path (str): Haar 级联人脸检测器文件路径
        camera_index (int): 摄像头索引,默认为 0
    """
    # 导入函数内使用的模块(避免重复导入)
    from tensorflow.keras.models import load_model
    import numpy as np
    import cv2
    import os

    # 加载训练好的模型
    try:
        model = load_model(model_path)
    except FileNotFoundError:
        raise FileNotFoundError(f"未找到模型文件:{model_path},请先运行训练模式")

    # 定义情绪类别
    emotions = ['Angry', 'Disgust', 'Fear', 'Happy', 'Sad', 'Surprise', 'Neutral']

    # 加载 Haar 级联人脸检测器
    if not os.path.exists(haar_path):
        raise FileNotFoundError(f"未找到Haar级联文件:{haar_path}")
    face_cascade = cv2.CascadeClassifier(haar_path)

    # 尝试打开指定的摄像头
    cap = cv2.VideoCapture(camera_index, cv2.CAP_DSHOW)  # 使用 DirectShow 后端
    if not cap.isOpened():  # 如果指定索引无效,尝试自动查找
        logger.warning(f"摄像头索引 {camera_index} 无法打开,尝试自动查找可用摄像头...")
        for idx in range(5):  # 尝试前 5 个索引
            cap = cv2.VideoCapture(idx, cv2.CAP_DSHOW)
            if cap.isOpened():
                camera_index = idx
                logger.info(f"自动找到可用摄像头:{idx}")
                break
        else:
            raise RuntimeError("未检测到可用摄像头,请检查连接状态或驱动安装")

    logger.info("摄像头启动成功,按 'q' 键退出")

    # 创建显示窗口
    window_name = "Emotion Detector"
    cv2.namedWindow(window_name, cv2.WINDOW_NORMAL)

    while True:  # 主循环,持续捕获视频帧
        ret, frame = cap.read()  # 读取一帧
        if not ret:  # 如果读取失败
            logger.error("无法读取摄像头帧")
            break

        # 将帧转换为灰度图以进行人脸检测
        gray = cv2.cvtColor(frame, cv2.COLOR_BGR2GRAY)
        # 检测人脸,scaleFactor=1.3,minNeighbors=5
        faces = face_cascade.detectMultiScale(gray, 1.3, 5)

        for (x, y, w, h) in faces:  # 遍历检测到的人脸
            # 在帧上绘制人脸矩形框
            cv2.rectangle(frame, (x, y), (x + w, y + h), (255, 0, 0), 2)
            # 提取人脸区域
            face = gray[y:y + h, x:x + w]
            face = cv2.resize(face, (48, 48))  # 调整为模型输入大小
            face = face.astype('float32') / 255.0  # 归一化
            face = np.expand_dims(face, axis=(0, -1))  # 添加批次和通道维度

            # 使用模型预测情绪
            preds = model.predict(face, verbose=0)
            emotion = emotions[np.argmax(preds)]  # 获取概率最高的类别

            # 在人脸框上方显示情绪标签
            cv2.putText(frame, emotion, (x, y - 10),
                        cv2.FONT_HERSHEY_SIMPLEX, 0.9, (36, 255, 12), 2)

        # 显示当前帧
        cv2.imshow(window_name, frame)
        key = cv2.waitKey(1) & 0xFF  # 捕获键盘输入
        # 如果按下 'q' 或窗口关闭,退出循环
        if key == ord('q') or cv2.getWindowProperty(window_name, cv2.WND_PROP_VISIBLE) < 1:
            break

    # 释放摄像头资源并关闭窗口
    cap.release()
    cv2.destroyAllWindows()
    logger.info("检测结束,摄像头释放")


def main():
    """
    主函数,通过命令行参数控制程序运行模式。
    """
    # 创建命令行参数解析器
    parser = argparse.ArgumentParser(description='情绪识别模型训练与实时检测')
    # 添加参数:运行模式(训练或检测)
    parser.add_argument('--mode', type=str, choices=['train', 'detect'], default='train',
                        help='运行模式:train(训练模型)或detect(实时检测)')
    # 添加参数:训练图像目录
    parser.add_argument('--image_dir', type=str, default=r'D:\demo\emotion\train',
                        help='训练图像目录')
    # 添加参数:模型保存路径
    parser.add_argument('--model_path', type=str, default=r'D:\demo\emotion\model.h5',
                        help='模型保存路径')
    # 添加参数:Haar 级联文件路径
    parser.add_argument('--haar_path', type=str, default=r'D:\demo\emotion\haarcascade_frontalface_default.xml',
                        help='Haar级联文件路径')
    # 添加参数:摄像头索引
    parser.add_argument('--camera_index', type=int, default=0,
                        help='摄像头索引(iVCam通常为1或2)')
    args = parser.parse_args()  # 解析命令行参数

    # 根据模式执行相应功能
    if args.mode == 'train':
        train_model(args.image_dir, args.model_path)  # 训练模型
    elif args.mode == 'detect':
        real_time_detection(args.model_path, args.haar_path, args.camera_index)  # 实时检测


if __name__ == '__main__':
    main()  # 程序入口,调用主函数
训练过程: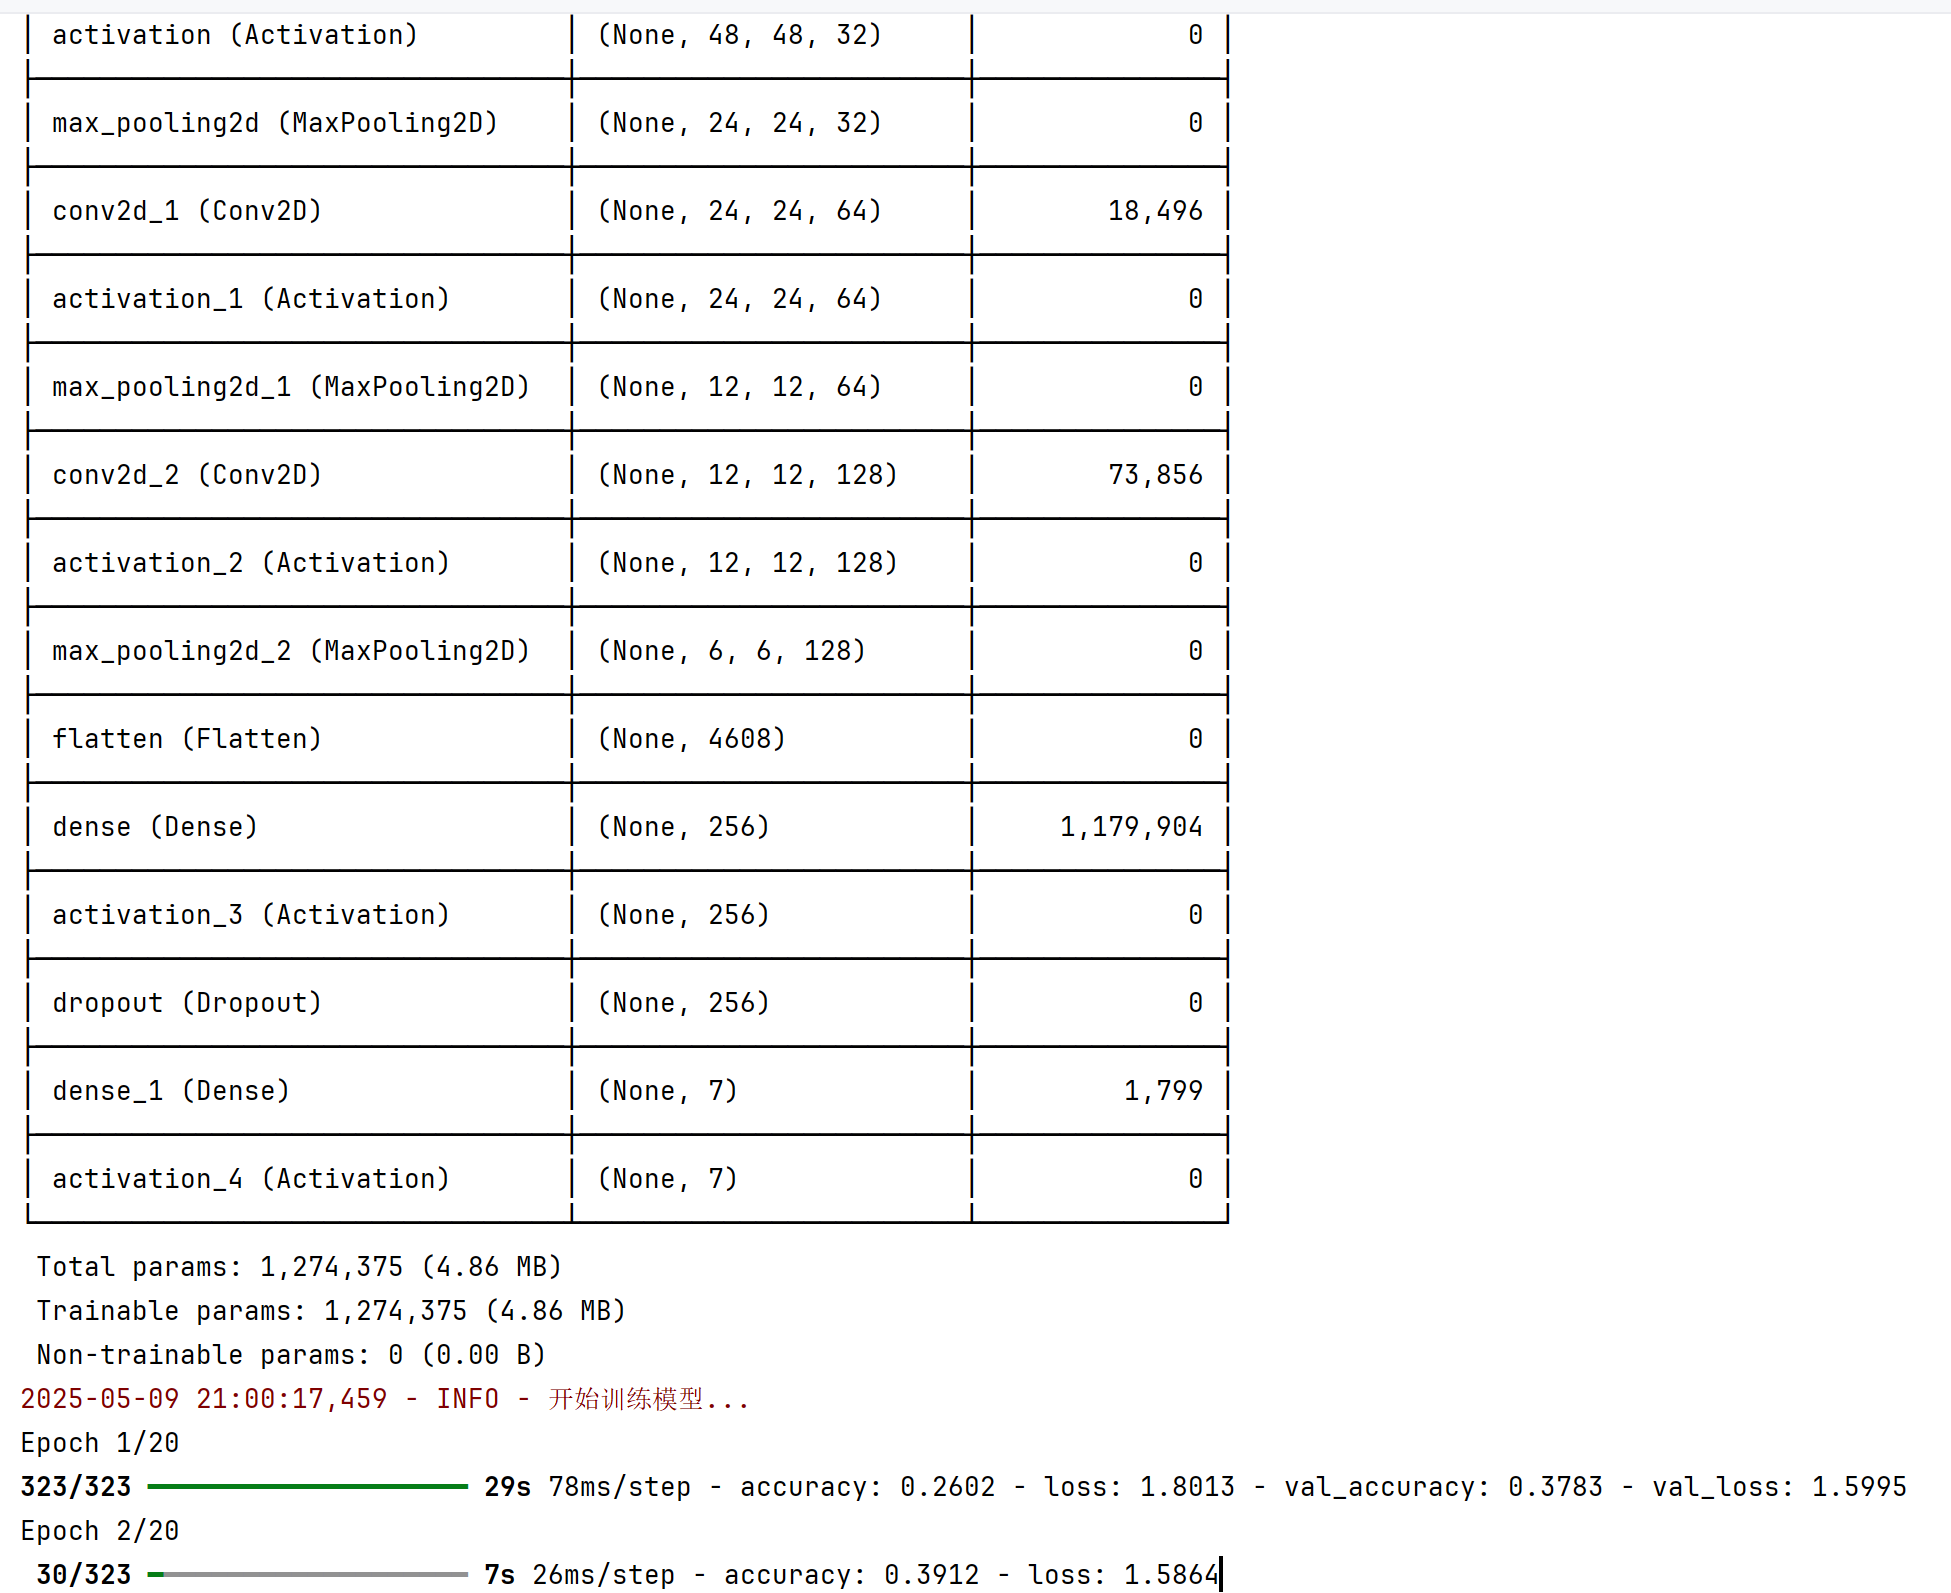
检测效果:
最后编辑:信息技术教研室 更新时间:2026-03-20 13:25